
Like all plants, aquatic plants need three main elements to grow and thrive: light, Co2 and nutrients.
As they photosynthesise, plants use the energy from light to convert the Co2 to oxygen and sugars for food, allowing them to grow and propagate.
They need a constant supply of Co2 during daylight hours or they will fail to grow or even die away.
Co2 is in the air all around us and some will get into an aquarium via gas exchange at the water’s surface, particularly if it is agitated.
Co2 is also produced in an aquarium by decaying fish and food waste.
However, it is not nearly enough for many aquatic plants or for a heavily planted tank. Plants that are flagged as being difficult or expert or even medium level will not do well without an additional injection of Co2.
Using Co2 for a planted aquarium is therefore essential even if you have good lighting.
Table of Contents
Using Co2 For A Planted Aquarium
How much CO2 does a planted tank need?
Tap water would typically have a Co2 level of 3-8 mg/l or parts per million (ppm) and RODI water around 6 mg/l. Even allowing for an increase in Co2 from fish and food waste you still fall short of what most aquatic plants need.
Most aquatic plants need a CO2 level of 14 – 23 mg/l for good, healthy growth. While sensitive or difficult species may need up to 23 – 36 mg/l.
Measuring Co2 In A Planted Aquarium
We found a good way of measuring Co2 in a planted aquarium via the JBL website. They have produced the following table where by measuring the PH and KH (Carbonate Hardness) you can read off the corresponding Co2 level.
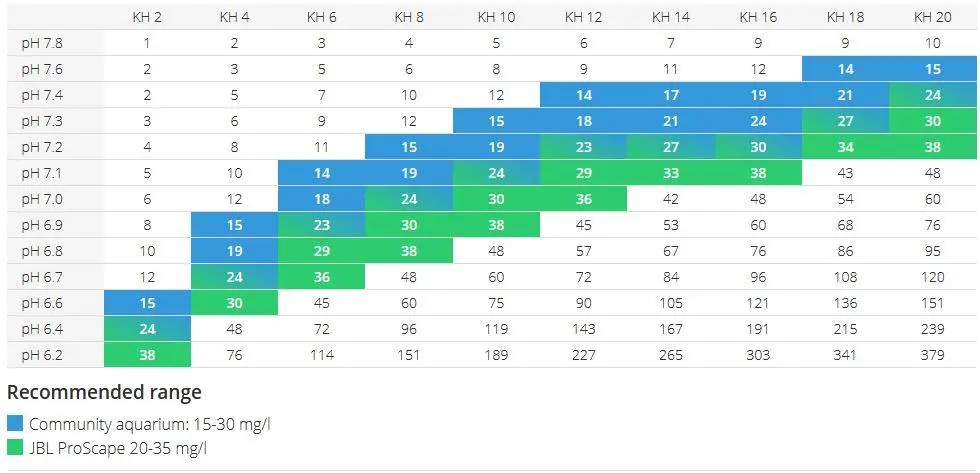
As an example, an aquarium with a PH of 7.0 and a KH of 6 would have a Co2 level of 18 mg/l.
If your Co2 is in the blue-coloured range then you should be able to grow low to medium-level plants but ideally, you want to be in the green-coloured range, around 24 – 36 mg/l Co2 to grow any aquatic plant (provided you have adequate lighting).
Most good freshwater test kits have a test for both PH and KH.
As you can also see from the table, whatever KH level you start at, increasing Co2 will also lower your PH level. This is great as most tropical fish and plants prefer a lower PH level.
The best way to get long-term control of these parameters is by using RODI water (with added trace minerals and KH buffers).
Co2 Systems For Planted Aquariums
Let’s take a look at the different Co2 systems for planted aquariums. All of them inject Co2 gas bubbles into an aquarium via a diffuser. (We’ll explain the different types of diffusers later in this article.)
Bio Co2 System For Planted Aquariums
Bio Co2 systems produce Co2 via a process of biological reaction. Sugar and yeast are added to water in a container, and as they react Co2 is produced.
The Co2 is then piped into the aquarium to a diffuser where it is released.
JBL sells a number of these kits and you can check them out below:-
 | JBL Proflora Bio160 | Check pricing on eBay >> (As an eBay Partner, I may be compensated if you make a purchase. This does not affect the price you pay.) |
Pros
- Cheap Start-up cost
- Intro to Co2 injection for beginners? Maybe…
- Good Diffuser
Cons
- No control over the amount of Co2 being injected
- Do not produce enough Co2 for most plants
- Messy
- If the piping or diffuser becomes blocked Co2 gas can build up and pop the piping or even rupture the container.
- Expensive Refills
DIY Co2 System For Planted Aquariums
DIY Co2 systems for planted aquariums are just Bio Co2 systems but you don’t buy a nice branded kit.
Make your own sugar and yeast mixture in an old plastic bottle, connect some piping to a diffuser, and away you go.
You can find videos on YouTube if you must but we’d just say that this method has all the ‘Cons’ of a branded Bio Co2 system but none of the ‘Pros’.
And you can add one more big Con:-
- Liable to Explode!
Co2 Injection System For Planted Aquariums
A good Co2 injection system is by far and away the best method of injecting Co2 into your planted aquarium.
In a nutshell, a pressurised CO2 canister or tank with a suitable regulator is connected via tubing to a diffuser that releases tiny bubbles of CO2 into the aquarium, as the bubbles dissipate they release the Co2 for take-up by our plants.
Let’s have a look at the different elements that make up a Co2 injection system. This diagram shows the entire process:-

CO2 Canister or Tank
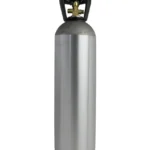
Your best bet for a Co2 tank is to try your local welding supply or home brewing outlets. Ideally, you’ll want a fire extinguisher-sized tank that you can buy and that they are able to refill as required.
We use a local Fire Protection service or if there’s a Paintball centre close by you can use those tanks.
You can also buy tanks online from Amazon or eBay but they will be delivered empty so you’ll still need to get them refilled.
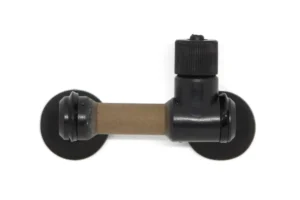
Regulator
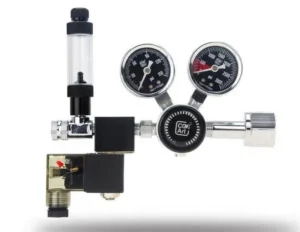
The Regulator is a key component in the Co2 injection system that regulates the flow of Co2 gas from the tank to the diffuser. You don’t want the gas to come out at fire extinguisher speed!
The regulator attaches to the Co2 Tank via the nut on the right in the picture.
The first dial along from the right measures the pressure of the gas in the Co2 tank itself and will go down as the gas is used, dropping into the red zone as it nears being empty.
The next dial shows the pressure of the gas being released out of the tank. You can control this by using the knob in the middle of the two dials. This should be set to around 40.
The fine-tuning of the gas release is done by the 2 small nuts on the left. Using these you adjust the number of bubbles that are released into the tank.
The tube on the top is filled with water so you can see, and count, the bubbles passing through.
The L-shaped box at the bottom left is the Solenoid, This is connected to a plug timer so that you can automatically turn the system on and off.
You do NOT want Co2 gas injected into your tank at night or when the lights are off.
We strongly recommend that you get a regulator with a solenoid.
Regulators can be expensive (£150 to 200) but you can usually get one much cheaper on eBay.
 | Co2 Regulator | Check pricing on eBay >> (As an eBay Partner, I may be compensated if you make a purchase. This does not affect the price you pay.) |
Bubble Counter
As mentioned above, a bubble counter allows you to count precisely how many bubbles you are releasing into your aquarium.
A good regulator will already have one but if yours does not you can easily obtain one and insert it between the regulator and diffuser.
 | Fluval Co2 Bubble Counter | Check pricing on eBay >> (As an eBay Partner, I may be compensated if you make a purchase. This does not affect the price you pay.) |
Diffuser
The diffuser is the final link in the chain of a Co2 injection system for planted aquariums.
You don’t want the single large bubbles coming from your regulator released into your tank. They would just float quickly to the surface with hardly any Co2 dissipation into the water.
A diffuser acts in a similar way to an airstone but has much finer pores so that as the Co2 gas is forced through, millions of tiny bubbles are released which dissipate Co2 much more easily.
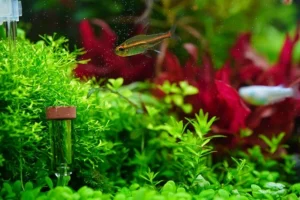
There are several different types of diffusers, an airstone type as shown here or a glass one as shown at the very top of this article. Both release millions of tiny bubbles and are efficient dissipaters of Co2.
Those bubbles are visible in your aquarium though, so we prefer the type shown below:-
 | JBL Proflora Taifun Diffuser | Check pricing on eBay >> (As an eBay Partner, I may be compensated if you make a purchase. This does not affect the price you pay.) |
With this type of diffuser. the bubbles are released at the bottom of an enclosed plastic spiral and as they climb to the top they dissipate releasing the Co2 into the water.
Whilst they are more obtrusive they can be hidden at the back of the aquarium behind larger plants.
Furthermore, as you can see, and count, the bubbles as they emerge there is no need for a seperate bubble counter.
Drop Checker
A drop checker is a visible indicator of the Co2 level in your aquarium.
A special solution is added into the bulb and then placed in the aquarium.
The solution is initially blue and will turn to a shade of green depending on the Co2 level in the water.
The lighter the shade, the more Co2 (and lower PH).
It is a good way you can tell at a glance what your levels are but you should still test your PH and KH levels regularly.
We prefer the slightly less obtrusive drop checker from JBL. See below:-
 | JBL Aquatest Co2 Drop Checker | Check pricing on eBay >> (As an eBay Partner, I may be compensated if you make a purchase. This does not affect the price you pay.) |
Pros and Cons of a Co2 Injection System
Pros
- Total and accurate control of the amount of Co2 injected
- Low running cost
- Easily controllable
- Stable CO2 production
- Automated control with solenoid
Cons
- Higher start-up cost
Do’s and Don’ts of a Co2 Injection System
- Do not overdose Co2. Adding Co2 will alter your PH and large swings in PH can be fatal to your fish.
- Start slowly. One bubble per second or less. Monitor PH and KH closely to measure Co2 level.
- Always turn off Co2 injection when the aquarium lights are off. Plants do not consume Co2 at night, in fact, they release it so you don’t want to be adding more. Use a solenoid to automate this.
- Turn your CO2 off 1 hour before the lights go out. There will be enough Co2 in the water for your plants to consume for the last hour. This will save your CO2 consumption.
- Plants consume the most Co2 at the beginning of the photosynthesise period so set your system up to turn on about 1 hour before lights on.
Automating PH Control For Planted Aquariums
As explained above, adding Co2 will lower the PH of your aquarium water and you should therefore closely monitor this via testing.
What if there was a way to automate this? What if there was a way to regulate the amount of Co2 injected depending on the PH level?
As PH rises, more Co2 is injected… as PH falls, less Co2 is injected…
To achieve this you need a PH Controller.
A PH controller is connected to your solenoid and will turn your Co2 injection system on and off depending on the PH level in the water.
The controller has a PH sensor which you place in the water and it then constantly monitors the PH level turning the Co2 on and off as required. You just need to set the desired PH level on the controller.
Something of a luxury perhaps but at what price peace of mind. Check this one out from JBL:-
 | JBL ProFlora PH Control | Check pricing on eBay >> *Free UK Delivery (As an eBay Partner, I may be compensated if you make a purchase. This does not affect the price you pay.) |
Using Co2 For A Planted Aquarium FAQs
Is CO2 good for planted aquariums? – Yes, particularly if the tank is heavily planted. Plants use the energy from light to convert Co2 to oxygen and sugars for food.
Many aquatic plants require more CO2 than is available from fish waste and gas exchange with the air outside the tank so we need to add it.
How do I add CO2 to a planted aquarium? – The best way to add CO2 to a planted aquarium is by using a CO2 injection system.
These use a CO2 canister with a suitable regulator connected via tubing to a diffuser that releases tiny bubbles of CO2 into the aquarium.
How often do you put CO2 in the fish tank with plants? – Plants utilize CO2 during the day during the photosynthetic period. They then release some CO2 back into the tank at night.
You should, therefore, only release CO2 during the day and turn off your CO2 system at night.
What aquarium plants do not need CO2? – Many easy-to-grow, hardy beginner plants do not require additional CO2 injection. Plants such as Amazon Swords, Java Fern, and Anubias.
Take a look at our article on the Best Live Aquarium Plants For Beginners for plants that can be grown without additional CO2.